Loop Fence Puzzle Loop Fence Puzzle Solution, Step by Step
Loop Fence Puzzle Solution, Step by Step
Stuck on a loop fence board, or just finished one and want to know whether you solved it the "proper" way? This loop fence puzzle solution guide walks through one complete 6×6 board, from the empty grid to the closed loop. Every move comes from a rule, so you can use the same four steps on any loop fence, Slitherlink or Fences puzzle, including the 10×10 boards in our free online loop fence game.
A quick reminder of the rules: draw one closed fence along the lines between the dots, never branching and never crossing itself. Each number tells you how many of that square's four sides are fence. Empty squares can have any number. The same puzzle is also sold as Loop the Loop and Slitherlink, so this method works under every name.
How to solve a loop fence puzzle in four steps
- Mark every 0 and settle the 3s.
- Work the corners and the edges of the grid.
- Let the numbers and the dots push each other until nothing changes.
- When you get stuck, assume one gap and look for a contradiction.
The sections below take one board through each step.
In the pictures below, blue lines and blue × marks are the moves made in that step. Orange lines are fence and grey × marks are gaps proven empty in earlier steps. In step 4 a red circle marks the dot where the fence gets stuck, and in the finished picture the yellow squares are inside the fence and a dashed blue circle marks the segment found in step 4.
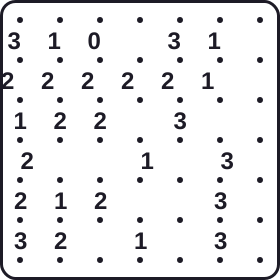
The example board. Rows are counted from the top and columns from the left.
Step 1: Mark every 0, then look at the 3s
Start with the numbers that decide all four sides at once. A 0 means none of its sides are fence, so put a × on all four. A 3 means only one side is missing, so 3s react to almost any information around them.
On the example board the 0 sits in the top row, third column. Its four sides become ×.
Then look for 3s that touch. When two 3s share a side, that shared side must be fence, and so must the two outer sides parallel to it. Try to draw it any other way and one of the 3s ends up with only two fence sides, or the fence has to fork. The right-hand column has three 3s stacked on top of each other, so you can draw four horizontal fence pieces straight away: one above the top 3, one between each pair, and one below the bottom 3.
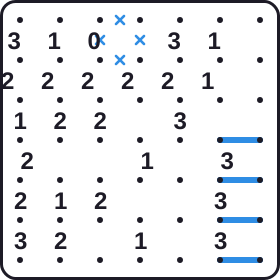
Step 1: the 0 is boxed in by crosses and the stacked 3s give four fence pieces for free.
Other 3 patterns worth spotting early: a 3 next to a 0 gets fence on its other three sides, and two 3s touching only at a corner get both of their far corners fenced.
Step 2: Work the corners and edges
The outer border is a wall the fence cannot cross, and that limits what can happen there.
- A 3 in a corner has its two outer sides fenced. The corner dot only has those two gaps, so they are either both fence or both empty, and a 3 cannot spare two sides. The example has 3s in the top-left and bottom-left corners, and each gets an L-shaped piece of fence.
- A 1 in a corner has its two outer sides empty. If one outer side were fence, the corner dot would force the other one too, which would give the 1 two sides. So the top-right 1 gets two ×.
- Finish what the corner gives you. The bottom-right 3 already had fence above and below it from step 1. Being in the corner adds its right side, and that makes three, so its left side gets a ×.
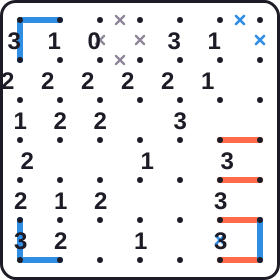
Step 2: all four corners are settled.
Step 3: Let the numbers push each other
Now repeat two checks until nothing changes:
- Count each number. If a number already has as many fence sides as its value, the rest of its sides are ×. If its open sides are exactly enough to reach its value, all of them are fence.
- Follow each dot. Every dot ends up with either two fence pieces or none. A dot with one fence piece and only one open gap must continue through that gap. A dot with two fence pieces gets × on the rest. A dot with a single open gap and no fence gets a × there, because a fence entering it would be stuck.
Here is how the first chain plays out. The top-left 3 has fence along its top. That fence reaches the dot between the 3 and the 1 and has to go somewhere: right along the top of the 1, or down between the 3 and the 1. If it went right, the next dot would be boxed in by the 0's crosses, a dead end. So it turns down. That single segment gives the 1 its only fence side, so the 1's top and bottom get ×. The 3 now has three sides, so its bottom gets a ×. Following the two fence ends downward, each dot has only one open gap left, so both lines continue into the second row.
The same two checks, applied again and again, fill in most of the board. You never guess here. Each mark has a reason you could point to.
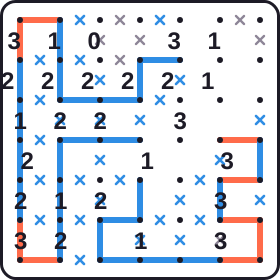
Step 3: counting and dot-following settle most of the board. A pocket around the top-right 3 is still open.
Step 4: When you get stuck, look for a contradiction
Sooner or later the simple checks stop giving new marks. On this board that happens with a small pocket left around the 3 in the top row, fifth column. Now pick one undecided gap, assume an answer, and follow the consequences. If the assumption leads to something impossible, the opposite answer is correct.
Assume the top side of that 3 is empty. Then the 3 needs its other three sides: left, right and bottom. Its left side runs up to a dot on the top border. That dot has three possible gaps: the one on its left is already ×, the one on its right is the side we just assumed empty, and the one going down is the fence we just drew. A fence that reaches a dot with no way out is a dead end, and a loop cannot have dead ends.
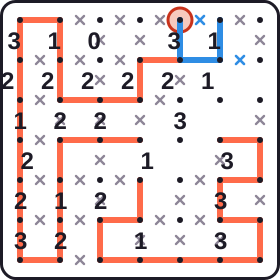
Step 4: the assumption (blue ×) forces three fence sides on the 3 and strands the circled dot.
So the assumption was wrong, and the top of that 3 is fence. Go back to step 3 with that new segment: the counting and dot checks finish the pocket, and the fence closes into one loop.
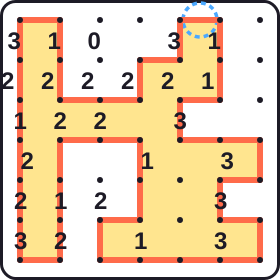
The finished loop. The yellow squares are inside the fence, and the dashed blue circle marks the top side of the 3 that step 4 proved is fence.
Two other contradictions show up often on bigger boards. The first is a small loop: if a segment would close a loop while other fence pieces are still outside it, that segment must be empty. The second is inside and outside: every square is either inside the fence or outside it, and a fence segment always separates an inside square from an outside one. Shading a few squares you are sure about often reveals the next move.
Checking your answer
A finished loop fence solution passes four checks: every number has exactly the right number of fence sides, every dot has two fence pieces or none, the fence never crosses itself, and there is only one loop. Every board in our game has exactly one answer, so if your loop passes all four checks, it matches.
In the online game, Check marks wrong fence or wrong × in red without revealing the rest, and Solution shows the full loop when you want to compare.
Loop fence puzzle solution PDF
Want this guide on paper or as a PDF? Use the button below and choose Save as PDF as the printer. The page prints without the menus, with all six diagrams, so you can keep it next to a printed puzzle.
If you would rather solve on paper too, the printable loop fence puzzles page has blank grids from 5×5 to 15×15, one per A4 page, with the answers at the end of each pack.
Quick patterns to memorise
Once you have worked through a board or two, these five shortcuts save most of the thinking in steps 1 and 2:
- 0: all four sides are ×.
- 3 beside a 0: fence on the three sides away from the 0.
- 3 beside a 3: fence on the shared side and on both outer sides parallel to it.
- Corner 3: fence on both outer sides. Corner 1: × on both outer sides.
- Dot with two fence pieces: × on every other gap at that dot.
The loop fence puzzle page lists a few more patterns next to the game.
Practice the four steps
Start with a few 5×5 boards. They are small enough that you can see every number at once, and you will use steps 1 to 3 on each of them. Move to 7×7 once the counting and dot checks feel automatic, and save the 10×10, 12×12 and 15×15 grids for when you are comfortable hunting for contradictions and using the one-loop rule. Play the loop fence puzzle and try the method on a fresh board, or open the daily loop fence puzzle and solve the same grid as everyone else today.
Solving questions
How do you solve a loop fence puzzle?
Work in four steps: cross out the sides of every 0 and settle the 3s, use the corners and edges, let neighbouring numbers and dots force each other, and when nothing is forced, assume one gap and look for a contradiction. Every board on this site can be finished that way without guessing.
Is there a PDF of this solution guide?
Yes. Use the Print or save as PDF button on this page and pick Save as PDF as the printer. You get the four steps with all six diagrams, without the site menus.
What should I do when I am completely stuck?
First run the two checks from step 3 over every number and every dot again, because a missed forced move is the most common cause. If nothing changes, pick a gap next to a 3 or a 1, assume it is empty, and follow the consequences until something breaks. In the online game, Check shows any wrong marks in red without revealing the rest.